This is the second table I made for the Conan: Rise of Monsters miniatures game, by Pulposaurus Entertainment. It's based on the Abyss of Kun Whu concept art. I took those designs and incorporated them into this demo board, featuring a large skull carved over the entryway to a ruined temple.
The rocky hillside was carved out of insulation foam, with wood filler covering some of the gaps. The skull is a plastic Halloween skull from the craft store, and the carved pillars and walls are made from layers of 1/4-inch Cellfoam sheets.
These sheets were carved and glued to the table. Everything was covered with sand and talus stones. The exposed foam was painted with wood glue and black latex paint for durability.
Around the perimeter of the ruins are rickety wooden walkways. These were made from bass wood. I kept them separate for painting, along with a few of the fallen pillars.
These skeletons are the ones that became my Undead Legions Red Rain skeleton archers.
Here's a shot of the table with the painting finished, before I added the flock, static grass, and jungle plants:
The jungle plants are a mix of aquarium plants, with plastic and fabric floral arrangement leaves.
Small resin skulls were added into all the recesses of the architecture. I used Envirotex Lite Pour-On two-part epoxy resin, which was poured into recesses in the ground to create pools of water.
You can see the board in action and check out the game itself in Pulposaurus' CROM gameplay videos:
https://www.youtube.com/watch?v=jgbWyh9X4SM
'Til next time!
↧
February 24, 2015, 8:52 am
While working on my Space hulk Terminators, I'm magnetizing their feet so they can be placed on round bases for use in games of 40K. I touched on this briefly in my post about Brother Noctis, but I figured I'd show the process in more detail.
Since every model's feet are space differently, you'll need to make some adjustments when drilling the holes. Ideally, you want to have the magnets in the base set in two of the existing peg holes. If that's not possible, then use one of the holes and an open area. Check the fit on the bottom of the base to see which holes best match with the model's feet.
The rare earth magnets are 1/8-inch in diameter, so use a similarly sized drill bit to drill out the holes. Start by putting a hole in the model's foot and one in the base, through the peg hole.
To put the magnet into the model's foot, apply a dot of super glue to the top magnet in a stack. Press the magnet into the hole, leaving about 1/16 inch protruding.
Hold the magnet in place until the glue sets, then pull the rest of the magnet stack away. I find this method easier than trying to use tools or my fingers to hold the magnet; fingers are too fumbly and the magnet sticks to metal tools.
Drill out the other hole in the base.
To line up the spot to drill in the other foot, place the model on the base with its magnet in the first hole, and position the second foot over the other hole.
Then drill up into the foot through the bottom of the base. If it's difficult to hold the model steady, add a tiny dab of super glue to the feet. Use just enough to hold it in place and allow you to pop it apart when you are finished.
Now you have two perfectly positioned holes in the base and in the model's feet.
Glue the second magnet into the other foot. Then, add your basing material to the base, taking care to keep the holes clear.
To attach the magnets in the base, put them on the model's feet.
Then, stand the model on the base, with the magnets in the holes. Even with the thickness of the sand, the magnets will be at the proper depth to make contact with the model. This method also ensures you won't accidentally glue them with the magnetic poles the wrong way around.
Add some super glue from underneath.
Then fill the holes with some ballast (sand) to give the magnets more surface area to adhere to and prevent them from sliding down.
Once the glue holds on the sand and magnets, pop the model free.
And there you have it– perfectly positioned magnets for interchangeable bases.
'Til next time!
↧
↧
I've been bouncing back and forth between projects and took some time to work on Nagash a little more. This model has been on my desk for five months; at this rate the End Times will be over before I finish him!
Resculpting Nagash's head has been a stumbling block keeping me from making any further progress, but I finally tackled it and gave the big guy a properly proportioned noggin.
The classic metal bone giant head served as the starting point. It is scaled to Nagash's body and just needed its jaws resculpted.
After clipping away the old jaw, I sculpted new teeth. I initially sculpted the mouth closed, but the skull was so bland and expressionless that I cut the mouth apart and reworked it to have an open jaw. I also sculpted a frown to give Nagash appropriately "angry" eye sockets.
The crown portion of the hat required a little widening to fit around the eye sockets. This was accomplished by slicing away some of the plastic above the eyes.
The hat was cut away from the original head, and I widened it with some putty. In this shot, the putty hasn't been smoothed yet; I'm just checking the fit and angle of the hat on Nagash's head.
The putty on the hat was smoothed and allowed to cure, and then I glued it in place and sculpted the bone frame around the base of the hat.
Here you can really see the difference between the original, tiny head and the new head. (Without the mass of the hat to bulk it up, the tiny skull really looks ridiculous.) I added some plastic card mandible plates on the side of the head. They are scaled up a little, but match the shape and style of the original.
The final steps were to position the head and smooth over the neck join. I broke the putty apart to allow me to paint the head separately. I also attached the hanging strips and sculpted the transition up to where they connect to the hat.
A cabeza fit for a king! The only items left on this model are the books and basing and then I can finally start painting.
'Til next time!
↧
When I left off with the Stormfiends, I had converted the two rattling cannon poses into swappable, warpstone-armored melee monsters:
Now to finish them up by converting some doom-flayer gauntlets and magnetizing their remaining weapons. Two of the models will use the original gauntlets. The other two will wear converted gauntlets made out of the cover plates from the warpfire projectors.
Magnetizing the Original Gauntlets
To start, I needed to magnetize the gauntlets so they could be interchanged between doom-flayers or shock gauntlets. The attachment point within the gauntlet for the two options was too small to house a magnet, so I cut it out and fit a plastic tube inside. It is thick styrene tube with an interior of 1/8-inch (perfect to hold the magnet) and an outer diameter of 1/4-inch.
One magnet went in the tube and the other in the doom-flayer mace ball.
For the shock gauntlet, the 1/8-inch magnet barely fit, so I built up some material around it with modeling putty.
To keep the parts from spinning I added a small pin that would lock the part in place when attached.
Viola! Because of slight variances in the magnet positioning, some of the parts were a tiny bit crooked if improperly matched up. I numbered all the gauntlet parts to ensure the correct pieces fit together.
Scratch Building the New Gauntlets
I rounded the corners of a length of square basswood, and then glued it into the warpfire projector covers to form the core of the gauntlet. This was then carved with a hobby knife to create the tapered shape.
I glued a piece of etched brass to the underside.
The shape of the gauntlet was then sculpted around the grill with modeling putty. I built up the basic shape and then added the flange at the end once the first layer of putty had cured. The rivets were made by pressing a mechanical pencil (with the lead removed) into the putty. In this photo, the front end needs to be trimmed flat, and I have also added some brass tubing to either side. The tubes will be the attachment points for the whirling blades and hoses.
On the top of the gauntlet, I added another tube and covered the outer edge with putty to blend it into the surface of the armor.
Here are the finished gauntlets. Magnets were added into the back end where it would attach to the arm of the Stormfiend.
The mace-balls were a little tricky. I thought about using marbles, but couldn't find any the right size. In the end, I used a simple press mold to replicate the detail, one half at a time. They turned out a little rough, but they're of Skaven design, so that's okay. Between the two kits, I had enough whirling blades to fill out all four pairs of gauntlets.
The largest set of blades went into my parts bin. They are perfect for the sides of a doom-flayer weapon team, so I'll hang onto them until I decide to scratch-build one.
Attaching and Wiring the Weapons
Hobby Tip: When making a magnetized attachment that will accommodate multiple weapons, position the magnet in the arm first. Then fit the weapons' magnets to the arm. This will ensure that the weapons all sit correctly. (If you put magnets in the weapons first, you may find that their corresponding positions on the model are all slightly off center. Then, once you have the magnet in the arm, one of the weapons will be correctly positioned and the others will be slightly shifted.)
Once the arms and weapons were magnetized, I set about building the cables for them. I used 16-gauge floral wire for the cables. The wire fit perfectly into the brass tubes, and I drilled corresponding holes in the attachment points on the Stormfiend's back.
One set of cables fits the gauntlets. The windlauncher and warpfire projector's attachment points are further forward, so a sexond set of cables was made for them.
The warpfire projector's three-pronged splitter was further separated and rebuilt with thinner wire.
This setup will allow me to remove the splitter and attach the projector directly to the cannon mount on the third pose in the event that I want to field four models, two with windlaunchers and two with warpfire projectors.
Brain Rats and Basing
With the weapon combos finished, I attached the brain rats to the back of the Stormfiends and glued their tails in place.
Then, it was time to attach the models to their bases and make sure they rank up properly. This step was an absolute nightmare! These models are so bulky it was almost impossible to get them positioned so they would rank up base-to-base, and not be facing completely sideways. The best I could come up with was to either have their shoulders facing front, or their heads looking to the front, but not both. I know that the unit Skirmishes, and can move around in a loose formation, but the models need to rank up when engaged in combat. (And this unit should be spending most of its time in combat if used effectively.)
It might be a little while before I have these guys painted. First, I need to finish them off with some rattling cannon options.
'Til next time!
↧
September 2, 2015, 12:58 pm
I've been chipping away at a terrain commission for the past couple months. I haven't been authorized to post any photos of the terrain yet, so I can only say that it's for a system I've built terrain for already, and it's pretty cool.
But that means that I haven't had time to work on any personal projects recently. So, in an effort to avoid neglecting my blog for yet another week, I decided to take stock of my project queue and show off what's in the pipe. So, without further ado, I present...
The List of Things I Will Never Get To
The Final Stormfiends
These guys are so close to being finished I can almost taste it. Or maybe that's the paint and glue fumes in the air. A few bits of skin and fur, then their armor and some final details are all that remains.
And once they're finished there's still the pile of magnetized weapon options to finish.
The Rattling Cannon Stormfiends have been doing so well, however, that I don't have much incentive to finish the melee 'Fiends. In retrospect, I probably could have built these guys without all the different options. Optimal load-out indeed! The campaign has pretty much stalled anyway, so the Skaven are going to be relegated to the back burner in favor of the Undead. Still, my Skaven army is the only one without any unfinished projects, so I'll need to finish those models before I shelve them.
Two More Rat Ogres
It never ends. These guys will round out my Rat Ogres to an even 10. I'm considering a conversion using the leftover arm from the Hell Pit Abomination, to create a more Pestilens-themed creature. The gang has been talking about Mordheim, so I may start a Clan Pestilens warband, and that will give me an excuse to work on these.
The Last Five Terminators
I've been trying to finish one of these every month for 2015. After getting ahead for a little while, I'm back to lagging a month behind with this project. I had hoped to squeeze in the Genestealers sometime this year, but I think I'll be lucky to finish the marines.
Corpse Cart
Long-time readers may remember this from the Shelf of Shame post two years ago. Aside from the Terrorgheist, I don't think I've put together any of the new units introduced in the 8th Edition Vampire Counts book (Hexwraiths, Vargheists, Crypt horrors, Mortis Engine, Coven Throne). I've got all the kits languishing in my to-do pile, but before I get to any of those I need to get this thing off my painting table. Seriously, it's been over five years. At least I've given the zombies an ink wash since last time. Now that's what I call progress!
Nagash
It's been almost a year since I started this project. But he's a huge kit, and I'm converting the hell out of it, so I can't blame myself for taking so long. Still, when an epic campaign begins and ends resulting in the entire game system getting shitcanned before I can even finish the model, it's time to reevaluate how long I let my projects sit unfinished. Nagash is getting bumped to the top of the list so I can (hopefully) finish him for October.
Necrotic Colossus
And the "I'm never going to build you" award goes to the Warhammer Giant! I had a great idea for converting this model into a Colossus to accompany Tomb Prince Selketta (with a backstory explaining how the Khemrian spirit was bound to the corpse of an Empire giant) but now that the entire state of Warhammer is in flux, the enthusiasm for this project has been killed.
Are we going to use 8th Edition? The 9th Age? Kings of War? Are the Undead Legions carrying over into the 9th Age? Will the Kings of War army lists have undead giants? If we use the Age of Sigmar rules, I guess I can still field him with my undead. I'm glad I wasn't planning to arm him with a great bow, as that option is gone in the new age. I guess we'll see how things pan out, but for now it's back in the box for another year.
'Til next time!
↧
↧
September 9, 2015, 10:00 pm
I had a free moment between commission work. Did I use it to paint anything in my project queue? Hell no! I knocked out one of my "micro distractions." Micro distraction is the name I give to quick little projects that distract from the long-running unit grinds or large models that take weeks (sometimes years) to finish. These often result from a spark of inspiration for a conversion or an army accessory that can usually be knocked out in a day or two.
The Screaming Bell/ Plague Furnace has always irked me because it overhangs the back of its base in such a way that models can't be ranked up behind it. If they have staves or halberds (in the case of Stormvermin) just forget it!
![]() |
| There. Perfect! |
I had been toying with the idea of making a base to fit behind it, with models posed like they are actually pushing the Plague Furnace, and I finally pulled the trigger. (Hey, it was either this or spend the day blending the flesh on those two Stormfiends. I intend to put that off as long as possible!) I began with a 40mm and two 20mm bases to accommodate the six models in the spaces behind the machine.
The bases were glued down on a thin sheet of styrene card, and the gaps filled in with Aves Epoxy Sculpt. (You'll notice that I made two bases, because I'll eventually do this for my Stormvermin unit so they can push the Screaming Bell.)
Once the epoxy was dry, I cut the card around the bases and filed the edges to create a smooth, beveled side.
I super glued some ballast on the top, and then began adding the Plague Monks. I started with the front models, angling them in such a way that they wouldn't collide with the machine's framework. Their weapon hands were replaced with Crypt Ghoul hands– They are nicely sized, open hands, perfect for pushing the Plague Furnace.
Once the first two monks were positioned, I began adding the others. To attach the skinny Ghoul hands, I drilled out the sleeve and shaved the end of the wrist with a hobby knife so the hand pluged into the socket. This provided a much more secure bond than simply gluing two tiny flat surfaces together.
![]() |
| Patty Cake at +1 To Hit! |
The models in the back were posed to be pushing the ones in front of them, and everything lines up perfectly with the furnace.
I painted the monks to match the rest of the unit. To see the process I used, check out my Painting a Plethora of Plague Monks tutorial.
The monks rank up perfectly with the Plague Furnace now, and my modeling OCD is satiated for another day!
Coming up, We'll take the terrain train underground to see some new Wild West Exodus game tables.
'Til next time!
↧
September 12, 2015, 10:04 pm
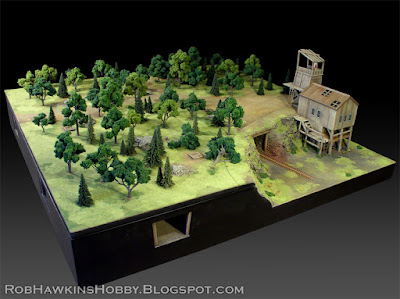
If you've been through my terrain galleries, you'll know that I've built a lot of terrain for the Wild West Exodus game. Outlaw Miniatures contracted me again to create some new battlefields. The first is a mining complex– A series of underground tunnels in a hillside, with a lift-off top that features an area of forested terrain.
The table measures 4'x4' and the mine tunnels were constructed from stacked 2-inch insulation foam. Each side of the table has two entry points, and the interior of the mine forms a series of crisscrossing tunnels and rooms.
Once the mine tunnels were cut, I framed the exterior of the table with thin lauan. Any gaps and staples were smoothed over with wood filler putty.
The front corner of the table has the main entrance of the mine, cut into a cliff face.
The cover (a piece of 1/2-inch fiberboard) was cut to the shape of the cliff, with a small portion permanently attached so there would be a clean edge at the front of the cliff. The seam was covered with wood filler putty. I roughed up the surface of the walls and cliff with a wire brush. It was a pretty cheap brush, and it was practically wrecked by the time I was finished!
I vacuumed up all the loose foam (and more than a few wire brush hairs) and sanded and spackled the top of the wall sections. I spread some wood filler on the walls to cover the seams between the two layers of foam and vary the rock texture. Then I added sand and gravel on the floor of the mine.
The sides were sanded as well, and I added four pegs on the corners to lock the cover board in place.
Holes corresponding to the pegs were drilled in the corners of the cover.
Some basswood strips were placed along the walls of the mine to represent the support beams, and then I began painting. The color was drybrushed with a series of greys and browns.
The tops and sides of the board were painted black, and I added the tracks for the mine cart using model railroad tracks.
The ramps and platform for the turnaround were made from foam core covered with basswood planking.
Ladders are scattered throughout the tunnels. They correspond to hatches on the top board so models can move between the two levels.
I made a bunch of mine carts using model railroad train wheels and styrene card. Outlaw Miniatures had also sent a batch of treasure and cargo with which I could populate the mine.
Since Wild West Exodus blends a mix of sci-fi and old west, I made a handful of high-tech lamps and painted a red glow around them. They were then glued in place in the mine.
I also made a ton of low-tech lanterns to hang on the hooks in the mine. Power cables were made from thick floral wire, bent over hooks in the support beams.
A gear system and generator was added for the turnaround.
The mine even has a caved-in tunnel!
Here's a top-down shot of the finished mine with the cover removed.
Coming up, we'll step outside and take a look at the forest and mining building in more detail.
'Til next time!
↧
September 14, 2015, 9:49 pm
For this week's post, I'm showing off the surface details of the mining table Outlaw Miniatures commissioned me to build for their Wild West Exodus game. The top board lifts off to reveal the network of mine tunnels below. To see the mine tunnels, check out last week's post here.
The board was first textured with sand and rocks, then painted and covered with flock and static grass.
Around the board are several hatches, which are positioned above the ladders in the mine tunnels. The ladders allow models to move between the upper and lower levels. I used styrene tubes, drilled into the board, to create plug holes for the trees.
The trees are a mix of pre-made pine trees and Woodland Scenics plastic tree armatures covered with foliage clusters.
Each tree has a peg on the bottom that fits into the holes, and they are all magnetized so the trees can be removed.
I made a corresponding number of tree stumps as well. The stumps are made from styrene tubing, with Liquid Nails spread on the exterior to create the bark texture. The tops are filled with wood filler putty.
The stumps can be inserted in place of the trees for areas of cut-down trees.
The entire forest can be clear-cut if desired, and a handful of trees are fallen trees.
The cover board, when removed from the mine, can be used as a separate battlefield.
Work in the mine is overseen from this mining building– A ramshackle, dilapidated structure with a few tech upgrades.
The building lifts off for storage and transport, and is held in place by magnets.
Stairs lead down to the lower level. The railing is strategically "broken" so that it doesn't break the plane of the upper level (for storage purposes).
And the tower provides a vantage point over the battlefield.
I didn't take any progress photos of the mine building's construction, but if you'd like to see how I make these Old West buildings, check out my post: More Wild West Exodus Buildings.
'Til next time!
↧
September 18, 2015, 2:45 pm
The second table I made for Outlaw Miniatures is this industrial complex, a processing center for RJ-1027 the compound that powers much of the Wild West Exodus technology.
The structures are all separate elements, and I'll show them off in more detail next week. The table base is a 4'x4' frame, with a stretch of railroad tracks and a platform that can hold the train station I had built in the initial batch of WWX terrain, which you can see in my Wild West Exodus Terrain Gallery.
The table was textured with sand and flock, with a few scrap piles scattered around. The model railroad tracks are the same as the ones from the mining tunnels. Envirotex Lite epoxy was used to create some pools of oil and toxic runoff. The bare table allows Outlaw Miniatures to set up the complex in different configurations or incorporate other buildings to create a town around the facility.
The industrial buildings create a multi-level gaming environment with modular walkways leading between the different structures.
A few smaller elements were created using some of the resin components Outlaw Miniatures had sent– A pile of damaged and leaking RJ-1027 canisters...
...and these two different scrap metal "hills." This was a good use of all the random off-cuts in my scrap box, combined with some of the wheels, bikes, and resin obstacles. Don't climb on these unless you've had your tetanus shots!
I'll close out with some top-down shots of the table and a look at the different walkways that weave around the complex. As I said, I'll get into the construction of the buildings a little more next week. For now, I'll let the photos speak for themselves.
'Til next time!
↧
↧
September 23, 2015, 1:39 pm
Here's a look at some of the construction of the buildings on the Wild West Exodus industrial board. The facility is used by Dr Carpathian for processing RJ-1027, the compound used to power his weapons and technology, as well as manufacturing his cruel instruments of destruction.
Alchemical Plant
The giant boiler heats and processes various chemicals and gasses used in Carpathian's weapon experiments.
The building is a foamcore frame, skinned with basswood strips and paneling. The windows, door, and small chimney are resin components that I've made for my projects. The Boiler is made from a section of PVC pipe and end caps, and fits into a cutout in the back of the building.
The coal furnace doors are made from plastic bottles, cut to fit against the pipe. The bottoms of the bottles are covered with 40mm bases, punched with rivets. The doors are built from styrene card. Some I-beams were added to support the weight of the pipe (it's actually quite heavy).
Above the boiler are the work platforms. All of the platforms are made from foam core with riveted strips of styrene, and U-Strips to cover the edges. Three small PVC pipes create the main stacks.
These Yakult bottles are great for terrain projects like this. Yakult is a probiotic drink that can be found in Asian supermarkets. The bottles have a unique shape that's great for chimney tops and industrial smoke stacks.
In the final stages, some details were added like the diamond deck plate, made from textured styrene sheets; the railings, made from large scale styrene ladders turned sideways; and the tech detail on the smokestacks, made from a Lawman Interceptor's gun mounts.
![]()
![]()
RJ-1027 Processing Silos
These huge silos house vast quantities of the compound. The structure is surrounded by gantries to oversee the operations and monitor progress.
All of the metal grating is made from Darice® plastic mesh. The craft store carries it in multiple colors, and while "clear" is what most people are familiar with, I prefer "black" because any areas missed by the primer won't be as obvious. The mesh is cut to the shape of the walkway, and the edges are sandwiched between an L-strip and a square rod. The plastic mesh doesn't really take to super glue, so I make sure the glue is bonding the styrene strips, seeping through the mesh to lock it in place once dry.
The silos, like the boiler above, are made from thick PVC pipe, with narrowing caps on top, covered with a 40mm base and resin components. The bottom PVC caps are molded with a seam and struts and already looks pretty interesting. A few more tech details and some bolts cut from styrene hex rod are added to finish it off.
The rails around the silos are made with a series of square rod, run vertically, and then curled and wrapped around horizontally. The silo windows are formed with thick PVC card and L-strip framing. The window itself is a sheet of red-tinted plastic fit into the grooves. To maintain the brightness of the red, the area behind it is left white when priming the silo. The result is a bright red window, with a glossy surface that stands out from the rusty metal.
The support pillars are scratch built from styrene strips, and the walkways were then positioned around them. To ensure there are no visible "bald spots" all of the components are painted separately and then assembled. This shot shows the final stages of assembly, right before I add the top plate and walkway.
the stairs lead up to each level, winding around the vertical framework. The base of the piece is made from 1/8-inch MDF board, stacked to create a step. The double layer also ensures that the base cannot flex, which prevents the other components like the gantries and silos from rocking and pulling apart. The bottom step is covered with diamond deck plate and the corners are all covered with styrene L-strips. With all the components assembled, some brown ballast is super glued in place to add a little dirt and crud (and to hide any imperfect cuts).
![]()
To paint all of this rusty metal, I first primed it black, then added a patchy spray of silver and red. Over top of this, a brown (similar to Formula P3 Bloodstone) was applied with a rough drybrush and using a sponge to blot the color. Patches of orange were also dabbed on with a brush and then blotted with a sponge. Some brown ink was painted in the recesses where appropriate, and the orange rust streaks were carefully painted with a fine brush. Some greenish oxidization streaks were also added using a mix of P3 Thrall Flesh and Arcane Blue. Throughout, you'll notice the RJ-1027 power cells are still mostly silver; this is to establish a difference between the newer technology and the older structures. Since the spent power cells would be rotated out, the ones in use aren't as weathered as their surroundings.
Iron Works Smelting and Casting
A blast furnace heats the crucible to thousands of degrees, melting iron and scrap metal. Inside the building is an iron casting facility where Dr. Carpathian's deadly armaments are manufactured.
I think this was my favorite building to make, since it incorporates such a wide variety of materials and unique shapes.
In the background of this shot, you can see the foamcore structure of the crucible. It's made from thick PVC pipe and sloped foam core panels that form an octagon around the pipe.
The workshop is built around the crucible and they both sit atop a base of two inch insulation foam. A thin layer of the foam is sliced away, and the lower level is cut with a stonework texture. the surface layer is coated with wood filler putty and cut with cracks. The result is a stone foundation covered with a cement facade that is crumbling away.
The crucible is framed with styrene I-beams and square rods to conceal the seams between the foam core panels, and the pipe is plugged with a foam core disc.
The release valve is made from a plastic bottle, styrene tube and strips.
The windows have metal shutters made from textured card and U-strips cut to form the latches. The little resin bits at the bottom are from some cable attachments that I made. In this shot you can also see the mesh walkway prior to painting.
The large RJ power cell is made from a plastic bottle covered with a styrene "sleeve". The styrene sleeve is painted separately and slides over the bottle so the clear windows are visible. The red RJ-1027 is painted on the inside of the bottle. Thick floral wire is used to create the connecting cables.
The copper roof was painted with an oxidization patina using P3 Thrall Flesh and Arcane Blue. All of the pipes were painted separately and added afterward. The interior of the crucible was painted with a red/orange/yellow glow of molten metal. That's right folks– working in a metal building with no air conditioning next to a thousand-degree cauldron of molten iron. And you thought your job was difficult!
Smoke Stacks
These giant smoke stacks spew black soot into the air from the furnaces below. This is the top of some underground facility, the inner workings of which one can only guess.
As with the other structures, the walls are made from foam core. The walls form up around a central rectangle of MDF board with two blocks of insulation foam, cut with stonework and mounted on it.
The stairwell is made with the plastic mesh and styrene stairs. I-beams form the corner supports.
Another area of mesh covers the cutout in the top platform, and a ladder runs up the opposite side. When designing these buildings and the layout of the table, I tried to incorporate multiple ways for models to access the upper levels of each structure. This, combined with the walkways between them, creates a unique multi-tiered gaming environment.
The furnace doors are made in the same manner as the ones for the alchemical plant.
The smoke stacks themselves are made from dollar store items– Plastic echo microphones and large crayon banks. They had just the right thickness and unique angles and bevels at the ends. Doctored up with extra details like rivets and pipes, they fit the bill nicely. The area between the two stacks is filled with all manner of junk– Aluminum foil for a base of shredded "scrap metal," larger components from my scrap box, and a few resin parts from WWX vehicles. The railings on the stairs are made from thick floral wire, with openings to place the modular connecting walkways.
All the buildings together make up the industrial complex. Check out last week's post here to see more shots of the full table, and check out the Outlaw Miniatures website for info on the Wild West Exodus game itself.
'Til next time!
↧
September 29, 2015, 7:55 am
When building my Skaven force, since it was a horde army with lots of models in large units, my goal was to have as few separate models as possible. To make deployment easy, I used as many regimental base strips as as I could. Unfortunately, I built myself into a corner because now the screaming bell won't fit in my stormvermin unit.
The bell fits just fine if I set up the unit in a 10-wide Horde formation, where I can have four models on one side.
But any narrower and there's nowhere for my four-man regimental strips to fit up front, and there aren't any single models left to fill out the gaps in the back ranks.
I picked up ten more stormvermin, which will allow me to bump up the unit to 50. Six of them will be converted into bell pushers on a large base and the other four will be singles. As I'm painting them, I'll take the opportunity to rebase a few of the regimental strips. The plan is to cut two of the four-man strips in half, and pop six guys off and put them on single bases.
With the Age of Sigmar round-base craze going on, I figure this will give me a little taste of what this would be like on an army-wide scale.
Because of the metal strips on their feet, the models on the double base need to be cut free with clippers. I also cut the strips away so the models can stand on the top of the new bases.
The models on the regimental bases come off a little easier. The already had their metal strips removed, so they just pop right off.
Breaking the models free leaves the feet needing some touch-up painting.
There are also some spots on the miniatures that didn't get painted while on the regimental strips. The models were close together and the sides behind the shields couldn't be reached with a brush, and were mostly unseen. Now that they will be on single bases, the sides of those models need to be painted.
Touching up the rats is easy enough– Some metal on the armor, a single coat of flesh on the feet, and a brown ink wash over those areas takes care of it.
The loose bases are sprayed with primer so the edges can be painted. I coat the top of each new base with super glue, position the model on it and sprinkle fine ballast over the surface before the glue dries.
For the strips that need to be cut in half, I measure to the center and make a cut in the side with a hobby knife. Then I slice along the underside of the base.
I cut as deep as possible to get through the plastic. Then, with a little flexing, the two halves of the base come apart.
I trim the cut side to match the angle of the opposite edge.
A strip of plastic is measured and cut to the height of the base. The strip is sprayed with primer on one side.
The un-primed side is glued to the base.
Then the corners are trimmed and sanded to create a smooth join.
Note that I accounted for the thickness of the plastic strip when trimming the base, so the final length matches the width of two single 20mm bases.
The final step is to paint the ballast on the new bases and paint all the sides green. Then I add static grass and use it to cover the join of the plastic strip.
The batch is rebased and ready to rejoin the ranks of their brood-brethren!
The new models are also finished, and the bell pushers came out great. I made these the same way I modeled the monks pushing their plague furnace. You can see that post here.
With the basing finished and the new models added, the 50-man unit of stormvermin can form up around the screaming bell in any formation!
'Til next time!
↧
It is accomplished! The remaining Stormfiends and parts for the melee gauntlet conversions are finished. With all the models finally painted, the six 'Fiends can be fielded as a unit of five, geared for tunneling and melee; a unit of four, armed with rattling cannons; or two units of three, one with ranged weapons and the other with melee weapons.
![]()
The new models are equipped with warp-laced armor and the gauntlets are magnetized so I can swap out the doom-flayer gauntlets and replace them with shock gauntlets. My initial impression was that the doom-flayers are the better option, but I'll have to try them out in an actual game. (Assuming I ever get to play Warhammer again.)
![]()
![]()
You may recognize these models as the rattling cannon pose. I had converted them with extra armor bits to represent the warpstone-laced armor and custom doom-flayer gauntlets.
![]()
![]()
![]()
The parts are magnetized so I can swap back and forth between the two options.
![]()
It's been a long road to get these guys finished. To see the entire saga of converting the Stormfiends, either click the 'Stormfiends' label in the sidebar, or you can jump to a specific post using the links below.
'Til next time!
![]()
![]()
↧
"And when Alexander saw the breadth of his domain he wept, for there were no more worlds to conquer."–Hans Gruber, Die Hard
![]()
With the completion of the Stormfiends, my Skaven queue is finally clear! There are still more models, of course– I have 100 Skavenslaves and two rat ogres from the Island of Blood set, and a bunch of plague monks to convert into censor bearers. I had been debating over whether to buy the new Thanquol and Boneripper since I don't use special characters very often. I've come to the conclusion that if I make Thanquol removable, Boneripper himself can be fielded as a second Hell Pit Abomination. I should probably grab a kit off the shelf while there's still a good chance that it will contain a square base.
I've compiled the photos from the older posts into my updated Skaven gallery, so they can all be viewed in one place. Click the SKAVEN tab under the header bar above to check out the gallery. I've also color-corrected some of the images. The poisoned wind globadier photos, for example, had always been too orange. All the shots should now be (mostly) consistent:
![]() |
| Original Theatrical Release |
![]() |
| Special Edition |
I've painted the Pestilens models with a unique color scheme so they stand apart as their own force. The Lightning Engineer Cult has been joined by the Conclave of Corruption, led by Lord Skabsis. I've made an alternate "plague" banner for my Stormvermin unit, for when the Conclave hires their services and, once I get to those Skavenslaves mentioned above, I'll have enough core units to field a "legal" Pestilens-themed army.
But those other Skaven projects will have to wait a while. For now, the rats are in the can (technically, the display cabinet). For October, I'm moving on to my Vampire Counts. I hope to have some spooktacular projects to post later this month!
Outlaw Miniatures has also sent me these awesome Wild West Exodus goodies. (Thanks, Romeo!) The plastic models in the starter box are really nice, and I'm looking forward to building them. (I'll have to make some WWX terrain for myself one of these days so I have a place to play!)
![]()
![]()
![]()
![]()
'Til next time!
↧
↧
October 24, 2015, 9:53 pm
This project grew out of a discussion with my friend Chris Walton about different ways to model plowed fields. While corrugated cardboard with one side peeled away produces great results, I've never been able to consistently peel off the cardboard covering without ripping it to shreds. I thought of the serrated trowels used to spread tile adhesive, and wondered if the technique could be used to create rows of plowed earth for wargaming terrain.
Cornfields and corn mazes are distinctly Halloween-themed, so I decided to try out the new technique for this year's Halloween terrain tutorial. This project will focus on the plowed earth, making stone walls, and using fake plants to create cornstalks.
![]()
Materials and tools that you will need:
1-inch thick insulation foam
1/8-inch thick PVC card
1.5-mm thick styrene plastic strips
0.5-mm thick styrene plastic sheet
1/4-inch styrene plastic L-strip
1/8-inch OR 1/4-inch thick MDF hardboard
Square basswood strips
22-gauge floral wire
Wood filler putty
Putty knife
Fine grit sandpaper
Liquid Nails construction adhesive
Super glue
Epoxy modeling putty (Brown Stuff or Green Stuff)
1/4-inch square notch trowel
Extendable snap-off knife
Steel ruler
Hobby knife
Clippers
Flat nose no-teeth pliers
Rotary hand sewing punch
Hole punch
Pin vise and pins (brass rod or paperclips)
Jeweler's saw
Power drill
Wood pencil and eraser
Bamboo skewers
Plastic floral arrangement plants
Assorted detail accessories (shield icons, spear heads, zombie parts, birds)
Sand or ballast
Static grass
Waterproof wood glue
Paint and brushes
*Use extreme caution when working with sharp objects. Follow all safety precautions and use all recommended safety equipment.
![]()
Step 1. Making the Base
MDF board is great for terrain basing. It's nice and sturdy, and resists bending or chipping. A single piece of 1/4-inch thick MDF is ideal, but if (like me) you only have 1/8-inch thick MDF, you can double it up. Cut the board to the desired size– anywhere between eight to twelve inches is fine for a small field. I've made mine 10 x 12 inches.
![]()
If you use two layers of thinner MDF, attach them with Liquid Nails. Let them sit under a weight overnight to the bond is secure and the boards are completely flat. Then, sand the edges to create a smooth finish.
![]()
Cover the edges with wood filler putty to conceal the seam between the two boards. Sand the putty smooth once dry.
![]()
Step 2: Making the Stone Wall
Begin by using an extendable snap-off knife cut 5/16-inch thick slices off of the 1-inch insulation foam. Use a new, sharp blade so it cuts cleanly without tearing the foam. Each of these slices will be a section of wall; cut as many as you need to fit around the perimeter of your field.
![]()
Next, use a hobby knife to cut the stonework. Again, make sure that the blade is new so it cuts the foam cleanly. To make the stonework, first make some horizontal cuts along the length of the wall. The cuts should be about 1/16-inch deep.
![]()
After the horizontal cuts, make some vertical cuts to create the individual stones.
![]()
By doing this along the length of the wall, you can make stone blocks of varying sizes.
![]()
Once the stones are all cut, use a wood pencil to trace over the cuts and create grooves along the lines.
![]()
![]()
Press an actual stone from the garden on the foam to create a realistic rough stone texture.
![]()
The final touch is to break up the level surface by using a pencil eraser to press in some of the stones. This will vary the depth of each stone to create an uneven surface that will really stand out when painting the wall.
![]()
![]()
If you need to make a longer section of wall, you can join two pieces by cutting one side along the stones. Trace along this edge with a pencil on the other wall section.
![]()
Cut the second wall section along this line, and add the stone texture. You now have two sections of wall that will fit together seamlessly like puzzle pieces.
![]()
![]()
To create a broken section of wall, simply cut the wall along the edges of the stones, and rough up some of their corners so they appear broken.
![]()
Once all the stonework is complete, paint each section of wall with a layer of wood glue. This will help protect the foam from the super glue used in later steps.
![]()
Step 3: Modeling the Base Edge
Cut a length of 1.5-mm thick styrene card into 1/2-inch sections.
![]()
Super glue these to the corners of the base. They will form the foundations of the wall's corner posts.
![]()
Use clippers to trim the tops of the card flush with the base.
![]()
Because the pieces overlap at the corner, one side will be a little long. Measure and cut off the excess so both sides of the corner are 1/2-inch long.
![]()
![]()
![]()
Use modeling putty to fill any gaps at the corner join, and between the card and the MDF base. Distress the edges of the plastic by cutting a few notches.
![]()
The edge of the base will form the bottom row of stones in the wall. Use a jeweler's saw to cut vertical notches in the edge with varied spacing to create different sized stones.
![]()
Here you can see how the finished stones will match up between the foam wall and the base:
![]()
Use a hobby knife to distress the edges and corners of the stones.
![]()
For the opening in the wall, mark off a three-inch area in the center of one side. Use the extendable knife to slice a bevel in the MDF base, about halfway down.
![]()
Super glue a matching length of styrene plastic L-stripping to the bevel.
![]()
Trim the top of the L-strip to meet the bevel height, and cut the bottom edge into a rounded, organic shape. This little protrusion will be the slope from the table surface up to the level of the field. Glue a 1/2-inch section of styrene strip on either side of the opening, the same way you did for the corners.
![]()
Step 4: Cutting the Corner Posts
From the 1-inch foam, cut a 1/2-inch thick section.
![]()
Slice the finished surface off of one end and then measure in 1/2-inch.
![]()
Cut again at the 1/2-inch mark to create a half-inch square length of foam.
![]()
Cut that into six 1 1/8-inch sections, and you have your corner posts and end posts for the wall.
![]()
Attach each post to a bamboo skewer so you have something to hold while working on them. Coat each of the foam posts with a thin layer of Liquid Nails.
![]()
To get rid of blobs of excess Liquid Nails, and to create a rough texture, gently roll the post on a paper towel. Once dry, the coating of Liquid Nails will allow you to super glue pieces to the foam without it dissolving.
![]()
Step 5: Detailing the Top of the Wall
Adding a row of flat slate stones along the top of the wall will help protect the foam, and it will create another level of detail finishing off the edge of the foam. Use 1/8-inch thick PVC card to make the slate toppers. Measure out and mark a series of 1/2-inch strips. Use a steel ruler to cut the strips, but don't cut all the way through just yet so the strips stay attached for now.
![]()
Next, make a series of perpendicular "V" cuts to create separations between the individual stones.
![]()
Vary the size of the stones. By keeping the strips attached, you can cut them all at once, rather than having to do each strip individually.
![]()
Once the "V" cuts are finished, separate the strips by cutting the rest of the way through lengthwise.
![]()
Finish them off by distressing the edges and corners with your knife and continuing the notches between each stone around the sides.
![]()
![]()
Now you should have enough wall sections, tops, and posts to go around the field. Paint the foam pieces with black latex paint to add another layer of protection, and to prepare them for painting.
![]()
Step 6: Detailing the Tops of the Corner Posts
Cut squares of 1/8-inch PVC card to make the stone topper for the corner posts. Make the squares 5/8-inch, and cut a smaller square 3/8-inch to fit in the center of it. Use a selection of shield icons and spearheads to decorate the corner posts and create the spike on top.
![]()
Distress the squares with your hobby knife. Then, glue the smaller square in the center of the larger square.
![]()
For the base of the spike, use a hole punch to punch circles out of thin sheet styrene. Use a rotary hand sewing punch to press rivets around the perimeter of the circle.
![]()
Super glue the circles in the center of the stone tops and drill a hole in the middle with your pin vise and a 0.85mm bit. Cut the heads off of some spears, and pin them on top of each circle.
![]()
Use super glue to attach the tops of the posts and to add shield icons on the sides. Plan which post will be on each corner so the spear heads and icons will be oriented properly. Use two icons on the corner posts and only one for the posts on either side of the front entrance.
![]()
Step 7: Plowing the Field
For me, this is where the whole project really began– This trowel can be used to create rows of plowed earth in wood filler putty. The tool is only $3.00 at Home Depot, practically a steal.
![]()
The notches are square, and my first attempt resulted in rows that were a little too angular and precise. To remedy that, I clipped the corners of the trowel to round them off. If you're doing this, make sure you use an older pair of clippers, because cutting metal isn't good for them. If you have a pair that's notched from cutting too many steel paperclips, that would be best. A pair of metal sheers would probably be better.
![]()
![]()
For the field itself, start by spreading wood filler putty over the entire surface of the base.
![]()
Cover the slope and smooth over the L-strip as well.
![]()
Next, use the notched trowel to pull grooves through the putty.
![]()
![]()
To eliminate any squared edges in the grooves and add a bit more texture, use a 1-inch brush cut flat, and stipple the putty. To keep the putty from sticking to your brush, and to add a layer of glue to attach some sand, dip the brush in a mix of wood glue thinned with water.
![]()
While everything is still wet, sprinkle a little sand over the surface.
![]()
Then, use one of the walls to push in the putty around the edges, making room for the walls.
![]()
![]()
Once you know where the walls will fit, scrape the excess putty off the edge of the base so the walls can glue cleanly to the board.
*Note: At this stage, if you plan to include a section of broken wall, add some loose, scattered stones by pressing a few pieces of pink foam into the wood putty where the break will be. I forgot this step, and had to add the stones prior to painting (below).
![]()
If necessary, add some sand or ballast to touch up the ground texture.
![]()
Step 8: The Cornstalks
Plastic floral arrangement plants are scaled nicely for use as the crops. The exact brand I used is Ashland Floral Essentials. The bunch was about $6.00 at Michael's Arts and Crafts. One of these yields a little over 100 cornstalks, which is enough to fill a 10" x 12" field.
![]()
Pull the individual parts of the stem. Cornstalks are a few feet taller than a man, so each leaf bunch can be cut into two stalks, each with four leaves at the top. Make sure you leave a little stem at the bottom so the stalks can plug into the base of the field.
![]()
Like any molded plastic, the plants have a mold line and some flash. Use a hobby knife to clean up the most obvious areas of flash.
![]()
Then, use a pair of flat nose no-teeth pliers to fold and crimp the leaves, so they all wilt over like the leaves of a dead cornstalk.
![]()
The finished cornstalk:
![]()
If you're making a field of live plants, you can leave them green. But if, like me, you are making dead cornstalks, you will need to paint them. Use a paint stick or scrap of wood to hold the plants. Drill holes along each side and push the stems into the stick.
![]()
Spray the entire set of stalks with Testor's Light Earth, and then spray them from the top with Testor's Desert Sand to match the color of dead, dried leaves.
![]()
Add a dot of super glue and some static grass in the tops of the stalks. The grass color I'm using is Woodland Scenics Harvest Gold, and it would work just as well if you're making live, green corn stalks.
![]()
To plant the stalks, drill holes in the field. You can use a pin vise, but a power drill will help speed things up.
![]()
![]()
Here you can see how the plants will stand in the field:
![]()
Step 9: The Scarecrow
I guess you could use a stuffed dummy to scare pests away from the field, but a thrashing zombie is a bit more convincing, and appropriate for Halloween! Make the stand with square basswood strips. Cut notches in the top and a slot in the stand so the parts can plug together. Build a suitable zombie model, and pose him to fit on the stand.
![]()
When making the stand, remember to make it tall enough so the scarecrow will be above the tops of the corn.
![]()
Super glue the zombie to the stand, and use some thin wire to "tie" him in place. Wrap the wire around his arms and shoulders. Leave some of the wire hanging so it appears as though one of his arms has broken free.
![]()
![]()
![]()
Use a larger drill bit to drill a hole in the base. Round the bottom of the scarecrow's post so it fits snugly in the hole.
![]()
Step 10: Painting and Assembling the Components
Here are all the individual parts, spray primed black:
![]()
*One thing I forgot to add before priming is a few stones on the ground where the wall is broken. These are just a few pieces of insulation foam, attached with Liquid Nails and then surrounded with wood glue and sand to help bury them and lock them in place. Ideally, these stones should be added while the wood putty field is still wet, when they can simply be pressed into the putty.
![]()
Start by painting the field. Drybrush it with Formula P3 Battlefield Brown, P3 Gun Corps Brown, and then P3 Menoth White Base.
![]()
Paint the insides of the wall sections, and the inside corner of the posts before gluing them in place, so you can get to them easily without messing up the field. The exterior and top of the wall will be painted after everything is attached. (See that step below for the wall color guide.)
![]()
Starting with one of the entry posts, scrape away any putty that might be under its footprint, and super glue the post in place. The post should sit perfectly over the added plastic strip on the base edge.
![]()
Mark where the wall section will meet the next post and trim it to the appropriate length.
![]()
Super glue the wall section down, and then cut a section of the top stones to match the length. Paint any exposed pink foam on the cut end with acrylic paint and allow it to dry so the foam can be super glued to the post.
![]()
Work your way around the perimeter, adding each wall section, top, and post in turn. Once the wall is assembled, paint the exterior so the wall sections and bottom edge of the base are all black.
![]()
To paint the stone wall, drybrush it with P3 Greatcoat Grey, and then add some Army Painter Ash Grey into the mix and drybrush with successively lighter layers, stopping with a final drybrushing of straight Ash Grey.
![]()
Add some variety to the stones by painting some with a thin layer of GW The Fang grey, and others with a wash of brown ink.
![]()
Finally, drybrush everything with a light touch of P3 Menoth White Base.
![]()
Basecoat the metal spikes with black and then drybrush them with P3 Pig Iron. Wash them using P3 Bloodstone, and paint some rust streaks down the side of the post.
![]()
Add a few patches of static grass, and the field is finished!
![]()
![]()
Paint the scarecrow the same way you would any other model. If you have any spare birds (like this crow from the Garden of Morr), you can add them to the scarecrow or the wall.
![]()
![]()
Plug the scarecrow's perch into the base and plant all the corn in the holes you drilled, but do not glue them, so they can be removed if models need to move through the cornfield.
![]()
Something like this is perfect for representing an area of Mysterious Terrain where the players don't know what's inside until their models enter it. But don't venture in alone... Who knows what walks behind the rows? Thanks for following along, and have a Happy Halloween, everyone!
![]()
![]()
![]()
![]()
![]()
![]()
'Til next time!
↧
November 3, 2015, 12:50 pm
I was hoping to have a few more posts in October, but it turned out to be a month of working on a bunch of different projects here and there. In the end I was trying to finish Nagash in time for Halloween, but didn't quite make it. Maybe by the end of this week. In the meantime, here are some other odds and ends that I have been working on (or am still working on).
Deneghra Commission
This is a commission from a couple months back. The client wanted a conversion using the top half of Deneghra and the bottom half of a Rackham Equanimous Warrior. I attached the two halves and resculpted the midsection and the back of her robes to match the wispy, ethereal nature of the model.
![]()
![]()
![]()
![]()
Death Star Helmet
One of my friends asked me to decorate his son's corrective helmet. After a lot of back-and-forth messages about the design, they finally settled on a Star Wars theme, and I suggested the Death Star under construction to match the shape of the partial helmet.
![]()
![]()
![]()
![]()
Spirit Hosts
My Vampire Counts queue contains a lot of models with ethereal bits– Spirit hosts, the mount for the Mortis Engine, Hexwraiths, and the supports for the Mortarchs' Dread Abyssal and the Morghasts. I have been struggling to come up with a color scheme that I like and an easy way to paint it. I'm currently experimenting with various washes and shades and plan to post a tutorial when I'm finished.
![]()
![]()
Nagash
The big guy's body is completed and assembled. His skirt and base are coming along nicely, but it's such a tedious process working around all the fire trails to pick out the books, bones, and basing. It will be a relief when he's finally finished. Here's a peek:
![]()
'Til next time!
↧
November 6, 2015, 10:54 pm
A few weeks ago I teased these books on Facebook. My plan for Nagash was to have the nine books breaking open, swirling around him in a tornado of hellfire. I glued each of the book halves in an open position and sculpted pages using Brown Stuff epoxy modeling putty. The single pages in the middle were cut from thin styrene card.
![]()
The books were then modeled into the flame trails that I had sculpted over the original spirits. Extra licks of flame were sculpted around each book and on the pages. Fine chain, coated with thin super glue to make it rigid, was used to build up the breaking chains, and thin wire was used for the breaking ties around the books.
![]()
![]()
![]()
![]()
Everything was primed black and the flames were sprayed white so the bright color of the fire could be easily achieved.
![]()
Here you can see how I had the model broken down for painting. I even made the right hand removable, pinned in place so I could swap between the spirit and the flaming book. I have a spare set of robes and spirits, and I plan to make a second base with a Tomb Kings motif because I am insane. The second base will use the unmodified spirit trails, and I'll swap out the hand so the model will feature either all flames (for the Legion of the Infernal Skull version) or all spirits (for the Tomb Kings version). The body will remain the same between the two and will not be glued into the robes so it can be swapped back and forth.
![]()
This thing took forever to paint. But here he is, finished, with all his body parts glued together:
![]()
Initially, I wasn't sure how to handle the transition from the fire to the robes. I decided to paint the holes in the cloth as though they were burned away. I'm really pleased with how it turned out.
![]()
The hand has a double pin to keep it from spinning. I completely forgot about the spines on the back when modeling the flaming pages. Fortunately, the book just barely clears the spine on the right. That could have been a disaster.
![]()
The torso clips into the robes, and the centerpiece of his belt is magnetized.
![]()
The base was detailed with unearthed coffins and tombstones. I built the coffins around the skeletons in the flame trails so it would appear as if they were being pulled out of their graves.
![]()
![]()
![]()
![]()
![]()
![]()
![]()
![]()
And here's the final model in all its glory:
![]()
![]()
![]()
![]()
![]()
![]()
![]()
![]()
![]()
![]()
Now to tear apart my hard work and put him on a round base...
'Til next time!
↧
November 13, 2015, 11:03 pm
I met up with my buddy Chris Walton this past weekend and we played a game of Age of Sigmar. He's a veteran of Warhammer like myself, and is getting back into the game with a new Khorne Bloodbound army. I brought out my Vampire Counts, and we played a "by the book" game, the only change being that we measured from the models' bases, rather than the models themselves.
I think the biggest challenge was trying to find a balance between the forces. Chris was limited by what he had brought, while I had my entire collection to pull from (and a new Nagash, if I wanted). Chris thought my initial force might be a little under-powered, so I added a few more units. The game was a lot of fun, but the armies were definitely not balanced.
We each had settled on our "army lists" before deploying, and I think that may have contributed to the lopsided battle. If we had simply taken turns deploying, I could have made a determination of our armies' capabilities as we went, and then deployed more if it looked like I was outmatched.
At that point, the deployment phase is almost a game unto itself. Whereas, in a traditional game of Warhammer, the players would be deploying their predetermined battle line so units supported each other and reacted to what was across the field, in Age of Sigmar, the players would be building their armies as they deployed.
There are plenty of comp systems, point values, and pool choices that tournament organizers and gaming groups have put together. I'd like to try out those some time, and see if that makes it easier to put together an army and a balanced game.
The Khorne Bloodbound:
1 Lord of Khorne
1 Bloodsecrator
1 Bloodstoker
20 Bloodreavers
20 Bloodreavers
10 Blood Warriors
3 Skullcrushers
3 Khorgoraths
The Vampire Counts:
1 Vampire Lord
2 Necromances
3 Wight Kings (one with the army standard)
5 Dire Wolves
5 Dire Wolves
5 Dire Wolves
42 Skeleton Warriors
12 Skeleton Archers
30 Grave Guard
3 Bat Swarms
1 Corpse Cart
1 Terrorgheist
The Bloodbound army was outnumbered by more than a third, so Chris chose "Endure" for his Sudden Death objective; if he could keep any of his models alive until the end of the sixth turn, he would win by default.
![]()
We rolled for the scenery rules, and the haunted crypt came up as "Arcane," meaning it would give any nearby wizards a bonus to their casting rolls.
![]()
![]()
![]()
For the scenario, we set up six grave markers along the center line. One of the graves contained an artifact that the armies were trying to recover. A unit could search one if it moved into contact and did not run. A dice roll of six would mean that they had found the artifact. If a six had not yet been rolled by the time the final grave is searched, the final grave will automatically contain the artifact. Once the artifact was recovered, the unit had to bring it back to their own table edge.
Our armies moved forward trying to secure the objective. I must say, this felt a little more like a game of Warhammer, with the two forces closing across the battlefield.
![]()
![]()
My Dire Wolves on the right flank (just out of frame in the above image) were the first to search, and I rolled a six, so they dug up the artifact (although I think they may have been more interested in the bones).
Kind of anticlimactic to have the objective uncovered immediately without anyone else getting a chance to search. I thought about it a little afterward, and maybe it would be a good change to say that the item can't be in the first place searched. There's a definite strategy there: As the players race to get to the objective markers, whoever gets to search first can decide where they don't want the objective to be. For example, you can choose to search an objective where you will be quickly outnumbered with no reinforcements nearby, knowing that you won't be handing the objective over to your opponent.
Back in the battle, my bats charged into the Bloodreavers...
![]()
...and the Grave Guard formed up to receive the charge from the Blood Warriors. Chris charged them into the Grave Guard and the two units began grinding away at each other.
![]()
On the left flank, my Necromancer had summoned a Varghulf, and sent it after the Khorgoraths, who made quick work of it. The Bloodcrushers and Khorgoraths then attacked my Skeletons.
![]()
In the bottom of turn two, the Bloodreavers disengaged from the Bat Swarms. Chris then won the roll for turn initiative, and got to go first in the third turn, which allowed to Bloodreavers to charge the wolves and surround them with pile-in moves before they could get away with the artifact. If I had gotten the initiative, the wolves might have gotten away completely unmolested (which wouldn't have made for a very exciting game).
The Grave Guard finished off the Blood Warriors and moved over the fence (leaving two of their number impaled on the spikes as they moved across). The Grave Guard had taken significant casualties, but their banner allowed them to resurrect a few models each turn. The Bats also moved in to help out the Dire Wolves, and I had the wolves retreat as soon as they could. The route that would get them the furthest away was forward, toward the opposite table edge.
![]()
Back on my left flank, the Skeletons were holding their own. I didn't go crazy with the summoning, choosing instead to buff the Skeletons with the Vampire's Command Ability and the Mystic Shield spell, giving them an extra attack and +1 to their save rolls. The Skeletons finished off the Skullcrushers and were slowly chewing their way through the Khorgoraths.
![]()
One of the tactics we got to see in practice was removing casualties to get units (in this case my Wight King character) out of combat. I was attacking with the Skeletons first, and inflicting enough damage to kill a Khorgorath. Chris would pull out the one closest to the Wight King, which meant the Wight King was no longer within three inches of an enemy, and therefore not eligible to make a pile-in move and attack. In retrospect, I was definitely making the correct choice to attack with the Skeletons first, taking advantage of all the bonus attacks I was getting from their numbers and denying Chris all the attacks of one of his monsters. The Wight King, by comparison, would only have contributed four attacks.
![]()
The Terrorgheist made it around to the fight, and the final Khorgorath was eliminated. I had summoned a Wraith who, with the aid of some Dire Wolves, kept the Lord of Khorne tied up. My Skeleton Archers finished him off with a volley of arrows.
![]()
By the end of turn four, Chris was down to his Bloodsecrator and Bloodstoker.
TheBloodstoker made a last-ditch attempt to kill the wolves running away with the objective, but failed all of his attacks. At that point we called it. He wasn't going to be able to kill them before they got away, and I had most of my army closing in. They certainly would have finished off the two characters before the end of turn six.
The game was a blast, and we learned a few things as we were playing:
One thing we were both surprised by (and I don't remember this coming up in my previous game with Jay) is the sheer volume of dice the players need to roll. My skeletons, for example, have one attack each. They gain +1 attack for 20 models in the unit, or +2 attacks if they have 30 models. The Vampire's Command Ability was granting them another attack. So, a unit of over 30 Skeletons gets four attacks per model, and almost all of them were in range of something to attack. That's around 120 attacks per combat phase, which is just ridiculous. Both of us were rolling multiple handfuls of dice every time we attacked with our units.
Something else that's a little tedious is having to roll for every unit when it runs. It's not terrible, it just adds another step that could otherwise have been streamlined. It also gets fiddly shuffling models around with pile-in moves every time a unit attacks in combat. There's definitely some strategy to the positioning– For example, going back to the point I made above, a unit of large models might be able to limit the number of attacks coming in by positioning themselves in a way that prevents large units of infantry from surrounding them.
There are definitely tactics to explore. I don't know if Age of Sigmar can be considered any simpler than Warhammer Fantasy. If anything, it offers the same level of play. What we gain in freedom of movement and being able to more easily interact with terrain, we trade for needing counters to mark what those terrain features do in each game, and having the game bogged down with literally thousands of dice rolls. I anticipate that keeping track of which units ran (and therefore can't shoot or charge), and which units have already fought in each round of combat, and how many casualties each unit has suffered over the course of the entire turn has the potential to either get very confusing, or clutter the battlefield with tons of tokens and counters to keep track of everything.
Otherwise, I was able to condense most of the Vampire Counts warscrolls. After trimming out the superfluous text and turning paragraphs into a short notes near the stat line, I could fit four scrolls onto a single page. I brought 20 pages of material down to 8, which will at least make flipping through rules much easier when I play again.
'Til next time!
↧
↧
November 19, 2015, 12:06 pm
Back on the Space Hulk Terminator front, Brother Valencio is finished:
![]()
The sculpting on these final few Terminators went pretty quickly. I'm replacing most of the dangly bits with other Space Marine details rather than sculpting them. I wasn't able to cleanly remove the wing on the right shoulder, so the rough patch was covered with a purity seal. I think this model required the most work on the legs to fix the undercut correction (places where the detail flattens of stretches to allow the model to come out of the mold).
![]()
![]()
![]()
![]()
![]()
![]()
![]()
![]()
![]()
The remaining Terminators' painting is in the final stages. I'm hoping to have them finished soon, along with a painting guide for the process I use to paint my Black Templars. Then I'll only have the Librarian to finish. The Genestealers will have to wait until next year.
![]()
'Til next time!
↧
November 24, 2015, 10:14 am
The last of the Terminators are finished! This has been a year-long journey, and the end is in sight; only the Space Hulk Librarian remains.
Brother Scipio
I feel like I've been saying this about every Terminator, but this guy required the most work to clean up his legs. Scipio is the marine who is kneeling and (for some reason) tearing up the floor. Since I've been removing all of the models from their plastic stands and putting them on traditional round bases, Scipio's floor bit had to go. That meant a major reworking of his hand and foot.
![]()
The entire toe was resculpted and the purity seal was widened to cover the irregularity on the back of his leg.
![]()
The underside of the shin grieve was easy enough to smooth out, but the fingers on his power fist needed to be completely redone. Rather than sculpt them, I cut the fingers from another Terminator and glued them in place with a little putty work to cover the join. I wasn't sure what to do with the hand, and at the last minute added a skull (it was just the perfect fit) as though he was collecting a trophy or perhaps the remains of a fallen comrade.
![]()
![]()
On the shoulder, I managed to salvage the existing skull, and then sculpted the cross around it. Surprisingly, Scipio didn't have very many blood drops that needed to be removed, so he required the least amount of "touch-up" sculpting.
![]()
![]()
![]()
![]()
![]()
![]()
Sergeant Gideon
Both of the sergeants had Blood Angel banner icons that I replaced with icons from the Black Templar upgrade sprue.
![]()
The storm shield proved to be a challenging resculpt. I needed to remove the skeleton and wings, but I wanted to keep the banner running around the edge. It was a four-step process: First, I sliced and scraped away the plastic details. Next, I used putty to smooth the surface of the shield. Then, I sculpted the cross. Finally, I sculpted the parts of the banner that go over top of the cross. The small skull below the cross is the head of the original skeleton that I carefully sliced away and then glued in place on the finished piece.
![]()
![]()
![]()
I think Gideon had the most pendants that needed to be replaced. In this photos, you can see which ones have been replaced, either with plastic Templar and Terminator parts, or sculpted over with putty.
![]()
![]()
![]()
![]()
![]()
![]()
Sergeant Lorenzo
I was dreading this model the most, but once I looked at him, there really wasn't that much work to do. I think the cape makes him look more complicated than he is.
![]()
![]()
He only had one pendant that needed to be replaced, and actually had two Templar cross icons on him already. Other than a few small skulls, the challenging sculpting went into replacing the Blood Angel icons on his leg grieves with Templar half-crosses.
![]()
The blood drops on the cape were sliced away and replaced with a circle of putty, into which I pressed a small tube to create an inner circle. They were painted like gemstones with a gold mounting ring. By this time, sculpting a cross and banner on his shoulder was old hat. The model needed to be primed in parts so I could ensure coverage in the recesses under his cape. He was then assembled and the join in the cape puttied and primed again. His chest plate was left separate for painting.
![]()
![]()
![]()
![]()
![]()
![]()
With these three, the Templar Terminator conversions are complete! They all fit perfectly on a display stand in my cabinet. I have been adding each one as I finished him, and seeing the dais gradually fill up with the Terminators has been like watching America's Next Top Model, except in reverse. And with less bulimia.
![]()
![]()
The spot in the middle is reserved for the Space Hulk Librarian. He wont be a Black Templar, though, for obvious reasons.
![]()
Coming up, I'll have a tutorial on the process I use to paint my Templars.
'Til next time!
↧
November 30, 2015, 12:45 pm
As I was wrapping up my year-long project to convert all the Space Hulk Terminators from Blood Angels into Black Templars, I decided to document my painting process. I've been collecting space marines since about the year 2000, and while the names of the colors have changed over the ages, my process has remained pretty much the same. Here's a tutorial you can follow for painting quick and easy Black Templars:
Colors Used
GW Colors:
The Fang (aka Fang Grey)
XV-88
Screaming Skull
Hashut Copper
Auric Armor Gold
Formula P3 Colors:
Thamar Black
Rucksack Tan
Moldy Ochre
Menoth White Highlight
Morrow White
Sanguine Base
Skorne Red
Khador Red Base
Cygnus Yellow
Pig Iron
Cold Steel
Quick Silver
Other Paints:
Secret Weapon Soft Body Black Wash
Koh-I-Noor Black India Ink
Liquitex Transparent Burnt Umber Ink (aka Brown Ink)
Testors Dull Cote
Start by spraying the model with black primer. Next, mix Thamar Black with Fang Grey and drybrush the entire model. The intention is to keep the mix very dark, but bring out the highlights in the model. Finally, mix a little more Fang Grey into the black and paint highlight lines along all the sharp edges. The mix should never get bright enough that it's straight Fang Grey; the intention is to create a black model with subtle highlights, rather than a grey model.
![]()
![]()
Once the black armor is finished, basecoat all of the areas to be white, bone, or parchment, with XV-88. Try to keep it clean, but don't sweat any minor brush strokes into the black area; those can be touched up later. The XV-88 brown creates a nice under layer so you aren't painting the brighter colors over straight black. When building up these colors, make sure each layer dries thoroughly so you don't pull up the paint when applying the next layer.
![]()
![]()
Basecoat the parchment with Rucksack Tan, and the skulls, crosses, wings, and shoulder pads with Screaming Skull.
![]()
![]()
Build up some highlights on the parchment with Moldy Ochre, and Moldy Ochre with a little Screaming Skull mixed in for the brightest highlights.
![]()
Basecoat the white areas (shoulder pads, wings, and crosses, but not the skulls and Crux Terminatus) with Menoth White Highlight.
![]()
Then, wash the skulls, parchment, wings, and crux with a mix of Brown Ink and XV-88. Be very careful to keep the wash controlled so it doesn't run onto the brighter white areas.
![]()
![]()
Bring the highlights back up on the parchment with Moldy Ochre and hit the edges with a little Moldy Ochre and Screaming Skull. Use a fine brush to carefully paint some Brown Ink into the recesses and folds of the parchment and add a slightly darker glaze if the highlight color gets too bright.
![]()
Highlight the bones and wings with Screaming Skull and a mix of Menoth White highlight. The bones and crux should stay "bone colored," so do not take their highlights up to straight Menoth White Highlight. But the wings should be highlighted up to straight Menoth White Highlight. You can also touch up any messy parts on the shoulder pads. As with the parchment, use a fine brush and straight Brown ink to paint in the lines on the crux and between the feathers of the wings.
![]()
Finally, highlight the bright white areas with Morrow White– The wings, shoulder pads, and Templar crosses.
![]()
Once you are satisfied with the white and parchment areas, use Thamar Black to touch up any spots where the color ran into the black armor. Carefully paint the black cross on the shoulder pad, and add some highlights with a mix of Fang Grey and black. Paint the cables with straight Fang Grey.
![]()
For the writing and litanies on the armor, use a fine brush and straight Morrow White, thinned with a little water so it flows smoothly. Simulate writing by painting a series of squiggles, dots and dashes. For the writing on the purity seals, the name, and the black writing on the shoulder pads, use India Ink. I recommend India Ink because it's more opaque than a black ink or wash, and will stay fluid in your brush much longer than black paint. If you find it too black, you can cut it with some Brown Ink. It should be noted that the India Ink dries shiny, but that can be taken care of by spraying the model with a matte finish.
![]()
![]()
Next, move on to the red bits. For the red lenses in the eyes, paint the eye with a 50/50 mix of Sanguine Base and Skorne Red. Then paint the bottom half of the lens with Khador Red Base. Add a highlight spot of Morrow White at the top of each eye. Finally, clean up the shape of the eye by painting black around the edge and touch up the grey highlight if necessary.
![]()
Paint the wax purity seals and red cables by basecoating them with Sanguine Base and layering highlights with Skorne Red and Khador Red Base. Paint the two lights in the back using a spot of Khador Red Base and a spot of Cygnus Yellow.
![]()
![]()
Next, spray the model with Testors Dull Cote to flatten out the color and eliminate any shine from the inks. Then move on to painting the metals; this will allow the model to have a flat, matte color while the metals maintain their metallic sheen. Paint the gold details with Hashut Copper, highlight them with Auric Armor Gold, and then wash them with Brown Ink.
![]()
Basecoat the other metal details (including the small rings where the cables attach) with Cold Steel. Basecoat the metal parts of the storm bolter with a mix of Pig Iron and Thamar Black to keep the weapon a dark gunmetal.
![]()
Wash the Cold Steel areas and the grey cables with Soft Body Black Wash. Once it is dry, drybrush the thick hoses on the arm with a little Cold Steel, and use a small drybrush to carefully drybrush some highlights on the gunmetal with Pig Iron. If there are any sword or knife blades, highlight them using Cold Steel and Quick Silver for the edges.
![]()
Paint some Soft Body Black Wash into the areas between the armor where the segmented joints are visible to create a differentiation between the flat armor plates and the shiny rubber under-suit. (Note that a GW washes like Nuln Oil won't work for this technique because they dry matte rather than shiny.)
![]()
For the sensor lenses above the head, paint the lens and ring with Cold Steel and wash it with Soft Body Black Wash. Then, paint the lens using the same process used on the eyes. Just put a red dot in the lower, tiny lens. Do this for any gems on the icons and pendants, as well.
![]()
With the model finished, you can base it to match your army aesthetic, and he's ready for the tabletop!
![]()
![]()
![]()
![]()
![]()
'Til next time!
↧